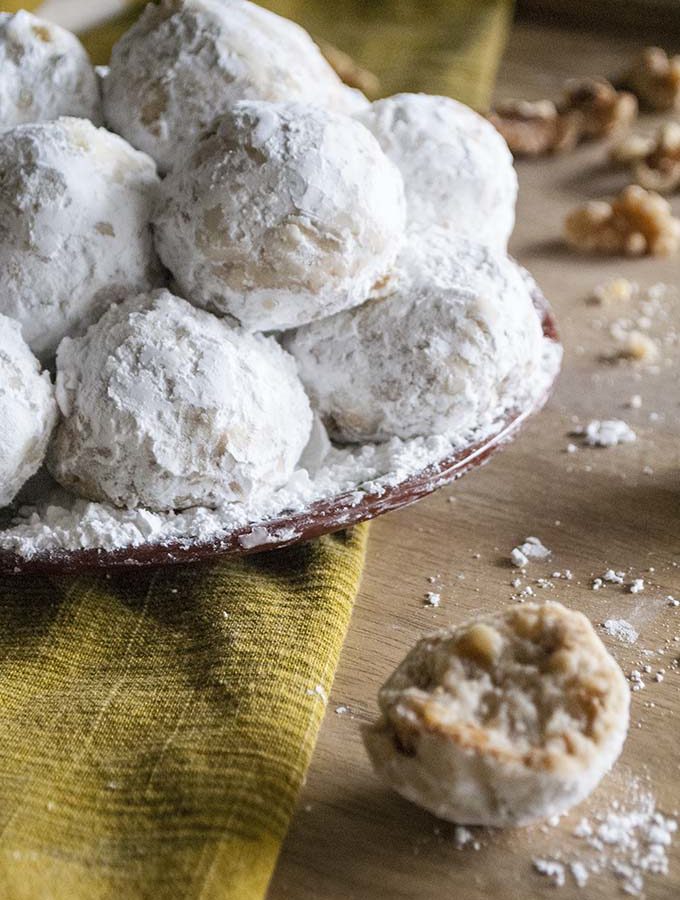
Sunday, March 7, 2010

Flourless Peanut Butter Cookies

I almost don't believe these peanut butter cookies are flourless and I just made them a few minutes ago. So I'm making dinner for a really special person this evening who happens to have Celiac Disease - so I can forget about anything made with wheat. But that's OK, I definitely don't mind cutting wheat out of my own diet, so it's all good! More about the special person...later. : )
Thanks to Gluten Free Goddess, I found this awesome recipe that has only a few ingredients and takes just a few minutes to throw together. Try it yourself - you won't believe it. Even if you don't need to eat gluten-free, you will love these sweet little things that can be whipped up at the last minute.

Make about 16 cookies (I cut this recipe in half and it worked great!)
Gluten Free Peanut Butter Cookies

Ingredients
1 cup peanut butter (I used Skippy's Creamy)
1 cup sugar
1 egg
1 tsp baking powder

Preparation
- Beat peanut butter with sugar for a few minutes with fork
- Sprinkle in the baking powder and mix some more
- Now add the egg and mix until it starts to really stick together and absorbs the moistness of the egg
- Roll in small balls and the roll in sugar
- Place on parchement paper and gently press down with the flat side of a fork (optional)
- Bake for about 10 minutes

Saturday, February 27, 2010

Red Chile Sauce

Some of the best sauces are the simplest things to make. The other day my daughter and I had brunch at this little restaurant on Santana Row in San Jose, CA called Consuelo Mexican Bistro and I was reminded of how important it is to take a little extra time to make sauces to compliment foods. Sometimes a sauce can be the whole point to the dish. I sort of feel the same about shoes. Sometimes I create an outfit to go with the shoes I want to wear. The point is, that sometimes the accessory is the show stopper or that thing that adds the oomph. That's exactly what I think about this chile sauce. It's great with grilled meats and tacos. I served this with fresh corn tortillas, braised pork (carnitas style) and quacamole.

Red Chile Sauce

Ingredients
12 dried guajillo peppers, stems, seeds and veins removed.
4 cloves garlic, blanched in boiling water for about a minute
1 tbls olive oil
1/2 c reserved water from soaking chilis
optional - you can also add a roasted, peeled tomato (but I prefer without)
salt to taste

Preparation
- Roast peppers on cast iron skillet for a few minutes.
- Soak in hot water for about 20 minutes. You'll have to put a weight on them (I use a bowl).
- Puree in blender with olive oil and garlic.
- Pour through sieve to seperate from the peels.

Serving suggestion:
Drizzle on any grilled fish or meat, serve with tacos, nachos and just yummy foods like that.
Enjoy!

Monday, February 15, 2010

Whole Wheat Oat and Nut Scones

Breakfast is my least favorite meal of the day because I'm typically just not that hungry. However, I know that my body needs something and a good breafast scone is the perfect choice for me. But not any kind of scone, since I'm not really into starting the day with a overly processed, overly sweet, unhealthy piece of pastry. Many times I'll go for some of the healthy-sounding pastries in bakeries, such as low-fat bran muffins, or other oat-type muffins or scones, but many of them leave me feeling like a ate a sugar-packed donut. So, what better way to get you what you want, than to just make it yourself! Although I'm not the best baker in the world, I've experimented with different baked recipes to find healthful pastries to enjoy in the morning - especially work mornings when I don't have time to prepare a small breakfast. For this recipe, I was tempted to call it "Scuffins" because they remind me of a blend of scones and muffins. In any case, I really like them, and think you might too if you have a thing for hearty morning pastries that are good for you!


Ingredients:
2 cups King Arthur's White Whole Wheat Flour ( I found this at Whole Foods and is a great whole wheat flour choice because it's got a lighter texture and taste than other whole wheat flours)
1 cup uncooked old-fashioned rolled oats
1/4 cup dark brown sugar
1 tbls baking powder
1 tbls cinnamon
3/4 tsp baking soda
1/2 teaspoon salt
1/2 cup butter (one stick), cut into little pieces
1cup milk
1 cup greek yogurt
2 tbls pure maple syrup
1 tsp vanilla extract
1/2 cup chopped walnuts (optional)
1/2 cup raisins (optional)

For pre-bake brush:
handful of raw oats
2 tbls pure maple syrup
1 tbls milk

1. Preheat oven to 400F. In a large bowl, combine oats, flours, brown sugar, cinnamon, baking powder, baking soda, and salt. Sprinkle butter cubes over flour mixture and use a pastry knife to cut the butter into the flour until the mixture resembles coarse crumbs. (you can also pulse briefly in food processor). I did this, but also used the tips of my fingers to rub the butter into the mixture until it looks like a course meal.

2. In a small bowl, whisk together the vanilla extract, milk, yogurt. and maple syrup Add this mixture to the flour mixture, stirring to combine. Stir in the walnuts and raisins.

3. Turn out onto clean, floured surface and knead a few times. If the mixture seems too wet still, just add a little more flour.

3. Shape dough into an 8-inch diameter circle or shape into a long retangle about 12/2". Cut with a sharp knife into 8 triangular shaped wedges.

4. Whisk together the last two ingredients (milk and maple syrup) and brush the tops of the scones and then sprinkle oats on the top.

5. Place on parchment lined baking sheet.

6. Bake 15-17 minutes, or until top is lightly browned.
7. Remove baking sheet from oven and allow to cool on a wire rack for 5 minutes.

Serve warm or cool with good coffee or hot tea. If you want to serve them as an addition to larger breakfast, that's great too! These are also just as good after being frozen. You can reheat or just let thaw and eat at room temperature. I don't butter them, but they would be fabulous with butter if you don't mind the extra fat. Fat tastes good! :)

Sunday, February 7, 2010

The BEST Cinnamon Buns


Seriously, is there anything better than a freshly made batch of warm Cinnamon Buns? OK, maybe there is... a warm batch of freshly made Cinnamon Buns with fresh coffee! I really can't add anything to this post, except  that  I hope you have a chance to try these because they are fun to make and really delicous to eat! Talk about a crowd pleaser!

UPDATE: I made these again and tweaked them to make them even BETTER! I rolled them a little different and explained below. I also added a few notes about freezing. I brought this batch to work with me and my coworkers loved them!


Ingredients

Dough
7-8 cups all purpose flour
1 c warm water
2 slightly beaten eggs
2 packets yeast
2/3 c sugar
2/3 c melted butter
1 c warm milk
1 tsp salt
1/2 tsp vegetable oil

Filling (this is what you spread on the dough before rolling)
1 cup sugar
3 tbls cinnamon
1/4 (or more) melted butter - it just depends on how buttery you like it.

Icing (this if for frosting after the buns are baked)
2 or more cups confectioners sugar
1/2 c melted butter
2 tsp vanilla extract
a little warm water

Directions:

Dough
  1. In a small bowl, mix together the warm water, yeast and a tsp of sugar. Set aside for about 10 minutes, until the mixture becomes foamy.
  2. In a large bowl mix together the following ingredients: 5 cups of the flour, milk, butter, eggs, sugar, and beat until the mixture is sticking together in one clump (takes about a minute). If the dough is still , add some really loose, add more of the flour. You don't really need to beat at this point. You can just use a wooden spoon to add the additional flour (not all of it yet, just keep the last couple cups to the side).
  3. Turn the dough out on to a clean, floured surface and begin to knead. You will now begin adding the additional dough as you knead because you'll notice that parts will become sticky. Just add a little at a time as needed.
  4. Knead for about 7-9 minutes. This is an important step.
  5. Now place the dough in a large greased bowl and rub the top side of the dough with a little oil. Place a piece of plastic wrap over the dough.
  6. Cover the top of the bowl with a towel and place in a warm spot for 1.5 hours. The size of the dough should double.
  7. After rising, remove the dough from the bowl and place on floured, clean surface.
  8. Punch the dough down and knead just a couple times and let rest for about 10 minutes.
  9. Knead a few more times and roll out in a large rectangular shape so that the dough is about 1/2 inch  thick. Make sure to flour the surface of the rolling pin so that it doesn't stick.
  10. Filling - Mix the sugar with cinnamon until its a nice light brown color.
  11. Brush the butter on to the surface of the rectangular shaped dough. Now sprinkle the cinnamon and sugar mixture generously over the butter.
  12. Beginning on the longest side of the rectangle, begin to roll evenly and tightly until you have a long roll. Then pinch the edges and seal the loose end. Don't roll too tight, or the middle will pop up while baking. Check the photo below to see how the unbaked and rolled dough should look in the pan.
  13. Grease rectangular pan with butter and sprinkle with about 1/4 c of the sugar and cinnamon mixture.
  14. With a sharp knife (or even dental floss) cut 1 inch slices and place them together in a rectangular baking pan. If you have too many, you can bake a few extra in a smaller baking dish. Don't put them too close together or they won't have room for their final rise.
  15. Cover with plastic wrap and then a towel and let sit for another 45 minutes.
  16. Before baking, drizzle with melted butter and sprinkle with more of the cinnamon and sugar.
  17. Bake at 350 for about 30 minutes, until the buns look nicely browned.
  18. Let cool a bit...
  19. Icing - mix the powdered sugar, butter, vanilla extract together. Add warm water, one tsp at a time until you've reached the consistency you prefer. Some people prefer and thicker icing, while others prefer a thiner icing that is barely visible. It's up to you! By the way, you don't need an electric mixer, just a fork or whisk is fine.
  20. Spread or drizzle the icing on the cooled buns. For a thinner icing, you can drizzle.
This is how the rolled dough should look before baking (although I would do it even less tight than this and don't put as close together)

Note about freezing: You can freeze at the stage below, and then remove several hours before baking so they can defrost and have their final rise. I've tried this and it works, but I think they're much better if you don't have to freeze them. I've also refrigerated overnight after the second rise, and before baking. Like the freezing, it works fine, but notice a little fresher flavor and fluffier dough when you just bake them immediately.


Serving suggestion: Quick, grab your favorite people! Get the coffee and eat!

Thursday, January 21, 2010

Green Chile Chicken Soup


I know this may sound funny, but I just run cold! I can be chilly in the middle of the summer when it's 80 degrees outside. That could be why soup is one of my all-time favorite things to eat since it can really warm you up. I'm hooked on soup, down blankets, and hot sun - all things warm and cozy. But when it comes to soup, I'm not talking about canned soup - I'm talking about fresh, homemade soup made with wholesome ingredients and served piping hot! You know what I mean... the kind of soup that can warm your body (from your head to your toes) as well as your heart. I've make a lot of Chicken Soup in my day, but this one is definitely one of my favorites because it's sort of a fusion of traditional-style chicken soup that my mom used to make, and mexican style soup. I love to mix things up a bit, in life and with my cooking. If you like spicy, hot, savory soup, you might want to try this one.

Green Chile Chicken Soup
Ingredients
1 whole chicken, cut up and skin removed ( I prefer natural and air-dried)
1 large white (or yellow) onion. slices thinly
4-5 green Anaheim Chiles, halved and de-seeded
4 Serrano Chiles, halved and de-seeded
2 cups frozen corn
1/8 c freshly chopped cilantro
1 can hominy/pozole (drained)
1 green bell pepper chopped
1 clove, crushed garlic
2-3 bay leaves
1 tsp cumin
1 tsp oregano
1 tsp chili powder
salt and pepper to taste
a couple limes
tortilla chips, optional

Preparation
- Bring chicken to a boil in large pot filled with water, skimming regularly
- After the water begins to boil, turn to low and simmer (partially covered) for two hours
- Remove chicken from pot, but reserve the stock! Strain the stock - I pour through cheese cloth.
- Once chicken is cooled off, remove meat from the bones (and discard bones) and set aside
- In medium or large fry pan, saute onions and bell pepper, oregano, cumin, chili powder, half of the chopped cilantro, in a few tbls of olive oil until the onions are translucent. In the last couple of minutes, add the garlic.
- Lay serrano peppers and green chiles flat, skin side up,  on baking sheet and broil about 10 inches from heat in hot oven (500 degrees) for several minutes until skin is charred. Now let the chiles cool, remove the skin, and then chop. Set aside.
- For the corn you're going to roast them in a similar way. Once the corn is defrosted, turn the heat to about 400 degrees. Spread corn on baking sheet and place in hot oven, near heat until brownish. Set aside.
- Pour strained stock in large pot and heat on medium high (at least 10 cups). Add the chicken, bay leaves, and remaining ingredients, peppers, corn, bay leaves, etc - bring to a light boil, turn down heat and simmer for about 25 minutes.
- Don't forget to remove the Bay Leaves.

Serving suggestion:
This soup is great with a squeeze or two of fresh lime juice and topped with some cilantro (and if you choose, crumbled or broken tortilla chips. I find that most soups, stews are better the next day, but whenever you serve it, make sure it's hot! Also good with warm bread or tortillas!
Enjoy!

Monday, January 18, 2010

Artichoke and Tomato Pizza with Whole Wheat Crust


Have you ever been asked what food you would choose to eat if you could only eat one thing? When I've been asked that question, pizza is always a food that comes to mind. It just has it all, doesn't it? It has warm bread, gooey cheese; it's savory, comforting, and it can be customized to include only the things you love. I mentioned in a previous post that as much as I love pizza, I never like the feeling of eating pizza that tastes really delicious, but leaves me feeling like I a ate a bunch of junk food. And I guess with all the carbs, fat and salt that most pizza has, that's really what it is. So you may have noticed that lately I've been going a little nuts with healthy pizza. I experimented again this past weekend, and discovered another good-for-you pizza - by combining a couple whole wheat crust recipes and different topping. I think I may have found my perfect crust! This version is lighter, thinner and more flavorful.

Artichoke and Tomato Pizza with Whole Wheat Crust
2 small pizzas

21/2 c whole wheat flour (and a little extra for kneading and rolling)
1/4 c extra virgin olive oil
1 tbls pure maple syrup
1 cup warm water
1 packet yeast (or 2 tsps)
1 tsp salt
1tbls chopped fresh rosemary
1 tsp dried basil
about 2 tbls cornmeal

Topping:
About a cup (or more) mozzarella cheese, shredded
1 tomato (roma's good for this) sliced thinly
1 c artichoke hearts, sliced
1/4 c black olives, sliced or broken
1 tsp crushed red pepper
1/4 c parmigiano or romano cheese, shredded
salt, pepper to taste

- Mix the flour salt and herbs together in one bowl
- Mix the maple syrup and olive oil in the warm water.
- Add the yeast to the water mixture and stir - let sit for about 5-8 minutes until foamy. If it doesn't foam, start over because that means that the yeast isn't active.
- Now pour the water mixture into the flour mixture and stir until all the flour is moistened.
- When it's all sticking together in a ball, turn on to a clean and floured surface.
- Knead for about 6 minutes, adding a little flour to keep the dough from getting sticky.
Note - most people seem to prefer to use mixers and food processors, but I prefer to knead the dough by hand. It doesn't take very long and there's something sort of fun about doing it. I think it makes a difference with the end result - or at least I like to think it does.

- After kneading, rub with a little olive oil and cover with a plastic wrap in an oiled bowl - and then cover the top of the bowl with a towel and let rise in a warm place for an hour or two.
- After it rises, turn out on a lightly flour surface and knead a time or two and then cut the dough in half.
- Roll into tight ball, rub with a little bit more oil and place in a ziploc bag over night.
- This dough can then be frozen or remain in the refrigerator for several days until you're ready to use it. I love that about this dough!

Pizza Preparation
- Heat oven and pan (a pizza stone works best) to 500
- Remove the dough from the refrigerator and let sit for about 15 minutes before rolling. It's just easier when it's not cold.
- On a floured surface, roll the dough out. I use my hands to stretch the dough in combination with a rolling pin. It should be pretty thin and about 10-12 inches in diameter.
-  Now place the dough on pizza peel dusted in cornmeal.
- Spread most of the mozzarella cheese on the dough from the center until about an inch from the edges.
- Place the tomatoes and the artichoke hearts in a pattern around the pizza.
- Add the remaining mozzarella cheese and sprinkle the olives on top.
- Using the peel, tilt the pizza and slide onto the hot pizza stone in the oven. I use a large spatula to help the pizza make it on to the hot pan.
- Bake for about 10 minutes, until the crust is golden brown and the cheese begins to bubble and toast and bit.

- Serving suggestion: Eat it while it's hot! We love to sprinkle the parmigiano cheese and crushed red pepper on the top. You can also drizzle a little olive oil as well. Just do me a favor, and don't dip in Ranch Dressing! ;  )  


Monday, January 11, 2010

Best in the World Red Velvet Cupcakes


So here they are! My fabulous sister-in-law finally sent along her recipe for her scrumptious Red Velvet Cupcakes that took first place in our holiday family bake off. I'm pretty competitive - especially when it comes to these bake-offs, but I'm never too proud to say when my brothers or sister-in-laws make something awesome and kick my butt. I'm all about sharing good recipes, even if they're not mine!! So here you go - maybe you'll win your next family bake-off with this one!

Red Velvet Cupcakes

Ingredients

•2 1/2 Cake Flour

•1 1/2 cups sugar

•1 teaspoon baking soda

•1 teaspoon salt

•1 tablespoon cocoa powder

•1 1/2 cups vegetable oil

•1 cup buttermilk

•2 large eggs

•1 oz red food coloring

•1 teaspoon white distilled vinegar

•1 teaspoon vanilla extract

Directions

Preheat the oven to 350 degrees F. Line 2 (12-cup) muffin pans with cupcake papers.

In a medium mixing bowl, sift together the flour, sugar, baking soda, salt, and cocoa powder. In a large bowl gently beat together the oil, buttermilk, eggs, food coloring, vinegar, and vanilla with a handheld electric mixer. Add the sifted dry ingredients to the wet and mix until smooth and thoroughly combined.

Divide the batter evenly among the cupcake tins about 2/3 filled. Bake in oven for about 20 to 22 minutes, turning the pans once, half way through. Test the cupcakes with a toothpick for doneness. Remove from oven and cool completely before frosting.

Cream Frosting

8 oz cream cheese
4 oz butter
4 c. confectioner's sugar, sifted
1 tsp. Vanilla extract
1/8 teaspoon Salt

In a large mixing bowl, beat the cream cheese, butter and vanilla together until smooth. Add the sugar and on low speed, beat until incorporated. Increase the speed to high and mix until very light and fluffy.

YUMMY! Thanks Asunta!

Saturday, January 2, 2010

Spinach and Mushroom Egg Scramble


It's been so nice to take a little time off work for so many reasons. But one thing I've noticed is that I've been able to spend a little more time posting to my favorite blog. ; ) During work weeks, it's a little tough to get motivated to get online after spending so many hours on the computer. I've been making morning scrambles for a long time, and sometimes I create one that sort of stands out from the crowd, and the one I made this morning definitely did. So incredibly simple, and just so tasty and healthy. It's perfect by itself, and especially good served with good toasted whole grain bread, or stuffed in a freshly made (and toasted if you like) flatbread like above. What a great way to start a day!


Nina's Spinach and Mushroom Egg Scramble

Serves 2-3 (depending on how hungry you and your guests are)

Preheat broiler and place rack on top slot

Ingredients
4 eggs
1 cooked and chopped Italian sausage (I used Chicken Italian Sausage from Trader Joes)
1/2 c sliced mushrooms
1/2 c rougly torn baby spinach
1/4 c shredded Asiago Cheese
salt and pepper to taste
a little butter for the pan

Preparation
- Whisk eggs with a little salt and pepper
- Add the torn spinach to the egg mixture
- In medium small non stick pan, add the mushrooms (with nothing else) and let them cook on medium to medium high heat until they have browned nicely. Turn heat down to a low to medium heat.
- Now add a little butter to the pan and then also throw in the chopped sausage (make sure it's cooked prior to adding to pan).
- Turn in pan until the sausage is heated.
- Pour the egg mixture in the pan and just turn with spatula continually untill the egg begins to look scrambled. - Never let the bottom get to hot so that the egg doesn't burn or start to smell too eggy.
- Sprinkle the cheese over the top of the egg scramble.
- Now take the pan by the handle with your hand covered of course, and place on the top rack in the oven (or broiler) so that you can broil the egg mixture to ensure that it's cooked all the way through. You don't need to do this more than a minute.
- That's it

Serve immediately by itself or spoon on top of a really good piece of toast. I toasted the flatbread that I made and then spooned the scramble in the center and folded it. It was delicious.
Enjoy!

Whole Wheat Flatbread


It's official - I'm on a whole wheat dough kick since my discovery of this wonderful homemade whole wheat dough just a few days ago. The recipe is Wolfgang Puck's Whole Wheat Pizza Dough. I'm even more excited about this dough because it was even better the next day. The leftover dough I refrigerated (and thought was mostly a pizza dough) turned out to be an almost better flat bread. I also learned that the it performed better as a pizza dough if you let it sit at least 24 hours before using. Above is a photo of the Roti-style bread that I made the next day and below is the another version of Nina's Whole Wheat Pizza - both made with the same dough!! By the way, Roti is an Indian flat bread.


I made this version of whole wheat pizza with spinach, garlic, prosciutto and mushrooms. I'm including both the ingredients and preparation for the dough, but also including my notes for the "flatbread" and preparing the dough for use the next day.

Wolfgang Puck's Whole Wheat Pizza Dough

Ingredients
3 + 3/4 c whole wheat flour
1 c cool water
1/4 c warm water
1 package active yeast (or 21/2 tsp)
1 tbls honey (I used pure maple syrup)
pinch of salt
1 tbls olive oil

Dough Preparation (from WP website):

1.In a small bowl, dissolve the yeast in the warm water. Add the honey and let sit for 5 minutes, until foamy.
2.Put the flour in a food processor fitted with the stainless-steel blade. Mix the 1 cup cool water with the olive oil and salt. With the motor running, pour the olive oil mixture and the yeast slowly in through the feed tube. Process until the dough forms a ball that rides around on the blade.

3.Transfer the dough to an oiled bowl, cover with plastic wrap, and let rise until double in bulk. Punch down the dough and knead it on a lightly floured surface for 1 minute. Divide the dough into 4 equal portions and roll them into tight balls. Place on a tray, cover with a damp towel, and let rest for several hours or overnight in the refrigerator before use.

4.Roll or stretch each ball of dough into a 7-to-8-inch circle. Place the circles, one at a time, on a wooden peel or on a baking sheet and build the pizza as desired.

My notes:

- If you're not going to use right away, after the dough has rested for several hours rub with a very small amount of olive oil and place individual dough portions in a plastic bag (for each) for next day (or more) use.

For Flatbread:
- After doing the step above, cut one dough portion into four equal pieces.
- Roll a ball with each piece..
- On clean and floured surface, flatten ball with your hand and roll out with rolling pin until it's about 6 inches in diameter. It should look like a small tortilla and be pretty thin.
- With a paper towel, rub olive oil on the bottom of a heavy bottom skillet (cast iron works best) and heat to very hot. You'll know when it's ready if a drop of water "dances" when dropped in the pan.
- When very hot, place the rolled out dough (one at a time) in the center of the pan and just when it barely starts to bubble, flip it over and do the same. It will start bubbling more, this is good.
- I kept turning in a circular pattern for even browning.
- It takes less than two minutes to cook them, and they should have dark little spots on them.

Serving suggestion: This bread is great for almost anything. It's great with dips like Hummus or here's my recipe for Baba Ganoush that would also be great with this bread...or with curry dishes, or with anything!

Enjoy!

Thursday, December 31, 2009

Nina's Asiago and Arugula Whole Wheat Pizza


I definitely don't write about healthy eating as much as I talk and think about it in life. I should start doing it more since it's a HUGE part of what I think about when it comes to food. One of my all-time favorite things to eat is pizza - not the kind you find at Round Table - but real pizza with hand-made crust and wholesome, fresh ingredients. It's not that easy to come across, and I always think about making it, but for some reason I never quite get around to doing it. With a week or so off work for the holidays I finally made the time - and this pizza is the result. I searched for a good whole wheat pizza dough, but found that most recipes included white flour (the evil flour)  ; ) and I really didn't want to compromise. It's not that I never use white flour - in fact I use it a lot - it's just that I wanted a healthy crust that I can use over and over, just so I can eat pizza every single day and feel good about it! Well, maybe not every SINGLE day.

Fortunately, I came across Whole Wheat Pizza Dough from Wolfgang Puck and was attracted to that one out of all the ones I came across because it was so simple and it didn't waiver on the whole wheat. I like the way it turned out, but I'm still going to play with the recipe next time to see if I can add a little garlicgirl twist. But the best thing about this pizza is that it's healthy and the toppings make this dish amazing (at least I think so).

Anyway, this is my last post for 2009. I wish everyone a prosperous new year and hope we get to share lots of good food in 2010!

Nina's Whole Wheat Asiago and Arugula Pizza

Serving  1-2 small pizzas (but there'll be enough dough for 4 small pizzas)
Ingredients

Wolfgang Puck's Whole Wheat Pizza Dough
3 + 3/4 c whole wheat flour
1 c cool water
1/4 c warm water
1 package active yeast (or 21/2 tsp)
1 tbls honey (I used pure maple syrup)
pinch of salt
1 tbls olive oil

Topping
2 c baby spinach leaves or Arugula
4 italian sausage, cooked and chopped or broken in small pieces (note: you can cook and slice thinly, or roughly chop. You can even remove from casing before cooking so you don't have to cut up).
1 c mozzarella cheese, shredded
1/2 c goat cheese, crunbled
1/2 c asiago cheese, shredded
juice of half a lemon (optional)
splash of olive oil
pinch of salt and freshly grated pepper to taste
1 clove garlic, thinly sliced
1 clove garlic, gently smashed (to rub in bowl before tossing spinach)

Preparation

Dough

note: I didn't use a food processor. I mixed and kneaded the dough by hand (it was sort of therapeutic). I'm not sure if it comes out better the other way. I liked the consistency, but then again I'm used to eating a lot of whole wheat/grain.

Dough Preparation (from WP website):

1.In a small bowl, dissolve the yeast in the warm water. Add the honey and let sit for 5 minutes, until foamy.

2.Put the flour in a food processor fitted with the stainless-steel blade. Mix the 1 cup cool water with the olive oil and salt. With the motor running, pour the olive oil mixture and the yeast slowly in through the feed tube. Process until the dough forms a ball that rides around on the blade.

3.Transfer the dough to an oiled bowl, cover with plastic wrap, and let rise until double in bulk. Punch down the dough and knead it on a lightly floured surface for 1 minute. Divide the dough into 4 equal portions and roll them into tight balls. Place on a tray, cover with a damp towel, and let rest for several hours or overnight in the refrigerator before use.

 4.Roll or stretch each ball of dough into a 7-to-8-inch circle. Place the circles, one at a time, on a wooden peel or on a baking sheet and build the pizza as desired.

Topping
- In medium mixing bowl, pour about a teaspoon of extra virgin olive oil in bottom and then rub raw garlic all around through the oil and around the bowl.
- Add the Arugula, a little pepper, a little salt - and the lemon juice. Toss thoroughly and set aside.

Pizza
- Once you've spread the dough out on a pizza pan (I used a round stone), you're ready to add the topping.
- First the sprinkle the goat cheese from the middle until 1 inch before the edge.
- Now the Asiago....and then the Mozzarella.
- The last layer before putting in the oven is the sausage.
- Bake at 500 degrees for about 10 minutes, until the cheeses have melted and the crust looks golden brown on the edges.
- Now the fun part: Remove and top the pizza with the Arugula.
- Cut in 6 or 8 slices with a pizza cutter.

Serving suggestion: Get a nice glass of wine, sit down with someone you love and enjoy this healthy and delicious pizza. I like to pile the Arugula on each slice and sort of fold it New York Style (even though it's nothing like NY pizza). I just like the idea of eating wonderful greens with pizza!

Don't forget to add anything - and everything - you like. Next time, I'll put a layer of thinly sliced garlic just because I was looking for a little more of that garlic bite!

Happy New Year!